Battery switch on travel trailer function is crucial for managing your RV’s power. Understanding how to use this switch correctly is key to extending battery life, preventing electrical issues, and ensuring safe operation of your travel trailer’s various systems. This guide will walk you through everything you need to know, from the different types of switches to troubleshooting common problems.
We’ll cover the basics of how battery switches work, the safety precautions you should always take, and how to maintain your system for optimal performance. We’ll also delve into the integration of the battery switch within the broader electrical system of your travel trailer, including its interaction with components like your converter, inverter, and solar panels. By the end, you’ll be confident in your ability to manage your travel trailer’s power effectively and safely.
Understanding Battery Switch Functionality in Travel Trailers

A battery switch is a crucial component in your travel trailer’s electrical system, allowing you to manage the power flow between your trailer’s batteries and various electrical appliances. Understanding its function and proper operation is essential for maintaining your RV’s power and preventing potential problems.
Battery Switch Purpose
The primary purpose of a battery switch in a travel trailer is to control the flow of power from your house batteries to the trailer’s electrical system. This allows you to disconnect the batteries when not in use, preventing accidental drain and preserving battery life. It also enables you to switch between different battery banks (if you have more than one) or connect to shore power without impacting your house batteries.
Types of Battery Switches
Travel trailers utilize different types of battery switches depending on their electrical system’s complexity and the number of batteries. The most common types include single-pole, double-pole, double-throw, and more complex multi-bank switches.
Single-Pole Battery Switch Operation
A single-pole switch is the simplest type, typically used with a single battery bank. It offers an “on” and “off” position, directly connecting or disconnecting the battery to the trailer’s system. To operate it, simply move the switch lever to the “on” position to power your trailer’s appliances, and to the “off” position to disconnect the battery.
Double-Pole Double-Throw Battery Switch Operation
A double-pole, double-throw (DPDT) switch is more advanced, often found in trailers with dual battery banks or those needing to switch between battery power and shore power. This switch allows for switching between two sources of power (e.g., batteries 1 & 2, or batteries and shore power) or disconnecting both completely. It generally has three positions: “Battery 1,” “Battery 2,” and “Off.” Carefully read the switch’s labeling to understand the correct position for your intended power source.
Comparing Battery Switch Types
| Switch Type | Number of Batteries Supported | Shore Power Integration | Complexity |
|---|---|---|---|
| Single-Pole | One | No direct integration | Low |
| Double-Pole, Double-Throw (DPDT) | Two or one with shore power switching | Often integrated | Medium |
| Multi-Bank Switch | Three or more | May include integration | High |
| Rotary Switch | Variable, depending on design | Variable, depending on design | Medium to High |
Connecting and Disconnecting Batteries
Connecting and disconnecting your travel trailer’s batteries requires careful attention to safety and proper procedure. Incorrect handling can lead to sparks, corrosion, and even injury. This section details the process for connecting and disconnecting your house battery from the chassis battery, emphasizing safety and maintenance.Properly connecting and disconnecting your batteries ensures reliable power and extends their lifespan. This involves understanding your battery switch’s operation and following established safety procedures.
Neglecting these steps can result in damaged batteries, electrical malfunctions, and potential hazards.
Connecting the House Battery to the Chassis Battery
This process typically involves a battery switch that allows you to isolate or connect the house battery (powering your interior appliances) to the chassis battery (powering your vehicle’s starting system). Before you begin, locate your battery switch—it’s often found near the batteries themselves. The switch usually has several positions, including “off,” “house,” “both,” and sometimes “chassis.” To connect the house battery, move the switch to the “both” position.
This connects both batteries in parallel, allowing them to share power. Always ensure the switch is securely in the desired position. After switching, check that your house battery is receiving power by turning on a house appliance.
Disconnecting the House Battery from the Chassis Battery
To disconnect the house battery, move the switch to the “off” position. This isolates the house battery, preventing any drain from your house appliances on your chassis battery. You might also choose the “chassis” position if you want to use only the chassis battery, for example, when you’re driving and want to charge the chassis battery without the drain of the house battery.
Again, confirm the switch is firmly in place. After switching, double-check that your house appliances are no longer receiving power.
Battery Safety Precautions
Working with batteries requires caution. Always wear safety glasses to protect your eyes from potential splashes of acid. Batteries produce hydrogen gas, which is flammable and explosive. Ensure good ventilation around your batteries to prevent gas buildup. Never allow sparks or open flames near batteries.
If you’re working with corroded batteries, wear gloves and protective clothing to avoid contact with corrosive materials. Be mindful of the polarity (+ and -) of the battery terminals. Connecting the wires incorrectly can cause sparks, damage to your electrical system, and potentially a fire.
Maintaining Battery Connections
Regularly inspect your battery terminals for corrosion. Corrosion can hinder the flow of electricity and reduce the lifespan of your batteries. Clean corroded terminals with a wire brush or battery terminal cleaner. Apply a corrosion inhibitor to the terminals after cleaning to prevent future corrosion. Ensure all connections are tight and secure.
Loose connections can lead to increased resistance and heat buildup, which can damage your batteries and wiring. Consider using anti-vibration mounts to reduce stress on battery connections, particularly on rough roads.
Flowchart for Switching Batteries
The following describes a flowchart visually representing the process. Imagine a rectangular box for each step, with arrows connecting them to show the flow.[Start] –> [Locate Battery Switch] –> [Verify Switch Positions] –> [Move Switch to Desired Position (“Both,” “Off,” or “Chassis”)] –> [Verify Power Status of House Appliances] –> [Secure Switch] –> [End]
So, you’re an audiophile who loves to travel? Awesome! Check out this guide on audiophile travel setups to make sure your tunes are always top-notch, even on the road. It’s all about packing smart and prioritizing sound quality. Then, once you’re set up in your camper, understanding the battery switch on travel trailer function is crucial for powering all your awesome gear – you don’t want your music to die mid-song! Proper power management is key to a smooth trip.
Troubleshooting Common Battery Switch Issues: Battery Switch On Travel Trailer Function
Your travel trailer’s battery switch is a crucial component, ensuring you can seamlessly switch between your house batteries and your tow vehicle’s charging system. When it malfunctions, it can leave you stranded with dead batteries. Understanding common problems and how to diagnose them is essential for maintaining power on the road.
Faulty Battery Switch Components
A malfunctioning battery switch can stem from several internal issues. The switch itself might be faulty, experiencing internal shorts or broken contacts. Over time, the switch mechanism can wear down, leading to inconsistent or unreliable operation. This often manifests as intermittent power or a complete inability to switch between battery banks. Sometimes, the problem isn’t the switch itself, but rather a broken or damaged selector lever or a problem with the internal wiring.
Careful visual inspection of the switch and its connections is the first step in diagnosing these problems.
Loose Connections and Corrosion
Loose connections are a frequent culprit behind battery switch problems. Vibration during travel can loosen terminal connections on both the switch and the battery posts. This leads to intermittent power or complete power loss. Corrosion on battery terminals and the switch terminals is another common issue. Corrosion acts as an insulator, hindering the flow of electricity and causing poor or inconsistent power delivery.
The build-up of corrosion can be green, white, or even blue-ish, depending on the type of corrosion. A visual inspection will reveal this problem.
So, you’re an audiophile who loves to travel? Awesome! Check out this guide on setting up your audiophile travel setup for amazing sound on the go. It’s crucial to have great sound, but equally important on a travel trailer is knowing how your power works. Understanding the battery switch on travel trailer function is key to avoiding dead batteries and ensuring your tunes keep playing all trip long.
Knowing your power setup is just as important as having great audio!
Diagnosing a Malfunctioning Battery Switch
Diagnosing a problem with your battery switch involves a systematic approach. First, visually inspect the switch itself for any signs of damage, loose connections, or corrosion. Then, check the connections at both ends of the switch – where it connects to the batteries and to the trailer’s electrical system. Look for loose wires, corrosion, or any signs of overheating (such as melted insulation).
Next, test the voltage at the battery terminals and at the output of the switch using a multimeter. A significant voltage drop between these points indicates a problem within the switch or its connections. If you have a dual-battery system, ensure that you are correctly testing the connection to the correct battery bank. Finally, try operating the switch multiple times; intermittent functionality points towards a failing switch mechanism.
Resolving Common Battery Switch Problems, Battery switch on travel trailer function
Solutions for battery switch issues vary depending on the problem. For loose connections, simply tightening the terminal connections might resolve the issue. If corrosion is present, clean the terminals using a wire brush and baking soda solution. Apply a corrosion inhibitor to prevent future corrosion. If the problem is a faulty switch, replacement is usually necessary.
This may require some basic electrical knowledge and tools; if you’re uncomfortable with this, consult a qualified RV technician. For problems with internal wiring of the switch, replacing the entire switch assembly is the most practical solution. Remember to always disconnect the batteries before working on the electrical system.
Troubleshooting Guide
- Problem: No power to the house batteries.
- Check: Battery switch position, battery terminals for corrosion and tightness, voltage at battery terminals and switch output.
- Solution: Clean/tighten terminals, replace faulty switch if necessary.
- Problem: Intermittent power to the house batteries.
- Check: Battery switch operation, wiring connections for looseness or corrosion, voltage fluctuations at switch output.
- Solution: Tighten loose connections, clean corrosion, replace the switch if the problem persists.
- Problem: Switch won’t move or is stuck.
- Check: Mechanical operation of the switch, any obstructions preventing movement.
- Solution: Lubricate the switch mechanism (if applicable), replace the switch if it is mechanically damaged.
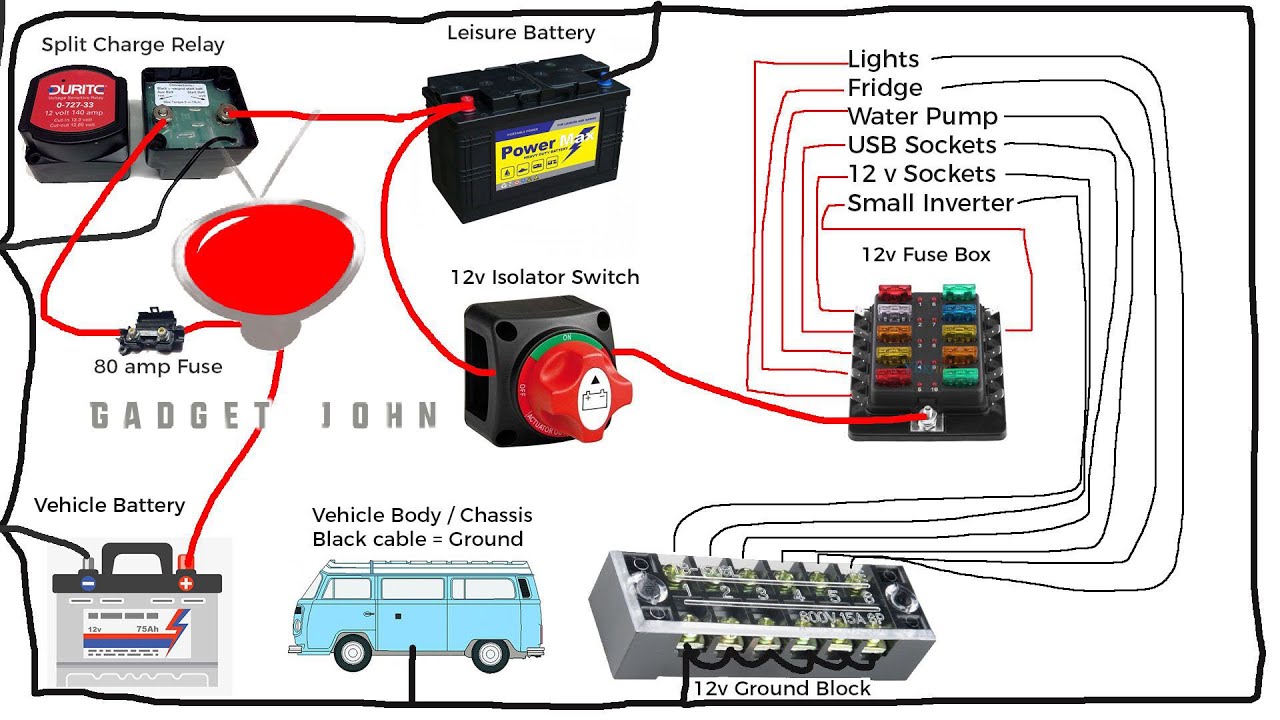
Battery Switch and Electrical System Integration
The battery switch is the central nervous system of your travel trailer’s electrical setup, controlling the flow of power from your batteries to the various appliances and systems. Understanding its role is crucial for safe and efficient RV operation. It’s the gatekeeper, determining which power source feeds your trailer’s needs and preventing accidental drain or damage.The battery switch works in conjunction with several other key components.
It interacts directly with your trailer’s batteries, providing the main power source for running lights, water pumps, and other 12V devices. The converter, typically powered by shore power (hooked up to an electrical site), charges your batteries and converts 120V AC power to 12V DC power for use within the trailer. Your inverter converts 12V DC power from the batteries to 120V AC power, allowing you to run certain AC appliances when off-grid.
Finally, solar panels, if installed, provide an alternative charging source for your batteries, supplementing or replacing shore power. The battery switch allows you to select which power sources are active and how they interact.
Safe Battery Switch Operation in Different Scenarios
Safe operation of the battery switch is paramount. During storage, disconnect the switch to prevent battery drain. This prevents the parasitic draw from even small devices from slowly depleting your batteries over time, leading to a dead battery when you next want to use the trailer. When traveling, connecting the switch allows you to power your lights and other essential systems.
Remember, you may need to keep the switch connected if you are using a battery-powered refrigerator while traveling. When using the trailer at a campsite, the switch should generally be connected to utilize both battery and shore power (assuming you’re hooked up). This provides redundancy and ensures consistent power. Switching the battery disconnect on or off should always be done with the trailer’s power disconnected at the source to avoid electrical shocks.
Electrical System Diagram
Imagine a simple diagram. At the top, you have your solar panels (if installed), feeding into a charge controller. The charge controller regulates the power from the solar panels and sends it to your batteries. Below the solar panels, you have shore power (120V AC) which connects to the converter. The converter charges the batteries and converts 120V AC to 12V DC for the trailer’s appliances.
Your batteries are central to the system. A line connects the batteries to the battery switch. From the battery switch, multiple lines branch out. One line feeds the 12V DC appliances directly. Another line connects to the inverter, which converts 12V DC to 120V AC to power AC appliances.
The battery switch acts as a central on/off point, controlling the flow of power from the batteries to the rest of the system. The diagram clearly shows how the battery switch acts as a central control point for power distribution within the travel trailer. This visual representation highlights the critical role the battery switch plays in managing power flow throughout the entire system.
Mastering your travel trailer’s battery switch is more than just flipping a switch; it’s about understanding your RV’s electrical system and ensuring its longevity. By following the safety guidelines, performing regular maintenance, and understanding the troubleshooting steps Artikeld in this guide, you can confidently manage your power, extend the life of your batteries, and enjoy worry-free adventures on the road.
Remember, a little preventative care goes a long way in ensuring smooth sailing on your next RV trip!
User Queries
What happens if I leave my battery switch on all the time?
Leaving your battery switch on constantly can drain your batteries, especially if you have parasitic draws from things like clocks or alarms. It’s best to turn it off when not using the trailer for extended periods.
How do I know which type of battery switch I have?
Check the switch itself for markings or look at your RV’s wiring diagram. The diagram should specify the type and amperage rating of the switch used.
Can I use a different type of battery switch as a replacement?
It’s crucial to replace your switch with one of the same type and amperage rating. Using an incorrect switch can damage your system or even create a fire hazard.
What causes corrosion on battery terminals?
Corrosion is often caused by exposure to moisture and acid from the battery. Regular cleaning and the application of a corrosion inhibitor can prevent this.
